Since the GEN 5 Camaro was introduced, enthusiasts have been looking for ways to get more Horse Power from their engines. One popular method is injecting Water /Methanol into the intake air stream. Significant gains can be had from a proper operating system.
Recently, I installed a Stage 3 Snow Performance Gasoline Boost Cooler on a 2010 Camaro SS. The kit came complete with a Digital Controller, Pump, Reservoir, and all of the other components needed to complete the installation. I opted for the Dual Nozzle Upgrade, which allows the use of different size nozzles to fine-tune the amount of methanol injected.
Benefits of Water Alcohol / Methanol Injection
- Lower air charge temperatures by 30-40 degrees
- Reduces cylinder temperatures by 200+ degrees
- Increases your 87-93 pump gas by 10-15+ points
- Allows the use of lower grade fuels
- Allows you to safely run more timing
- Cools and protects the tops of your pistons
- Longer, more stable combustion expansion and progression
- Removes carbon build-up from combustion chambers, pistons and valves
- Reduces and helps eliminate damaging engine detonation and pre-ignition
- No need for expensive racing fuel or additives
The digital controller is triggered by injection pulse width. Basically, as engine load and fuel requirements go up, so does injector pulse width. The controller on time is set by a user specified injector pulse width. As pulse width is increased, so is the flow of methanol. These adjustments are all done from inside the car on the controller making it super user-friendly to make adjustments on-the-fly.
The first step was to install the controller inside the vehicle. I chose to mount it to the top of the steering column. This provides easy adjustment and a clear view of the display.

Next, some of the wires were routed into the engine compartment through a factory plug in the firewall. This makes for an exceptionally clean pass-thru and no drilling is required. These wires are routed to the injection pump and the fuel injector is used to trigger the controller.

Next, the factory fuse box was removed from the left side of the dash. With the plastic cover removed from the back the internal wires are exposed. This is where the module will get its 12V power source.

Locate the two green wires in the harness. These are for the 12V accessory ports inside the vehicle. This will provide power to the controller, but only when the key is on.

I prefer to use butt connectors preloaded with solder and shrink tubing. Once the wires are connected and crimped, an additional layer of shrink tubing is installed. This connection provides the additional fuse for the Digital Controller. Now the factory fuse box can be reinstalled along with the additional fuse holder. Installing the wires from the back takes a little more time and effort but provides a stock look. This way there are no wires probing in the front side of the fuse box. When the fuse box cover is removed it still looks factory.


Next, the two blue wires were connected to injector #7. Once spliced, they are covered in additional wire loom and routed away from excess heat.

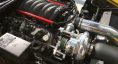
Now it is time to mount the pump that will provide the Methanol to the injectors. Our Camaro is equipped with a Race Intake Scoop from ADM Performance. This made the perfect place to mount the pump. It is completely hidden and made the routing of the lines quite simple.

In the picture below the pump is mounted to the ADM Scoop. The pump was grounded to the body using a 6mm X 1.0 stud. The Red 12V power wire is routed up to the digital controller. An inline check valve is also installed on the inlet side of the pump to prevent gravity feed from the reservoir.

Next the air intake tube was tapped to thread in the Dual Injector Nozzles. I used an 11/32 pre-drill and a 1/8”-27 NPT Tap. There are different options for mounting bungs depending on whether you are using a metal or plastic air intake pipe.

I took into consideration various locations on where to mount the Methanol Reservoir because I wanted to maintain a stock and almost unnoticed look. On the right side cowl area there is a cover that can be removed to access the air filter for the Heating and Air Conditioning. Under this cover, there is a lot of unused free space. So I made a custom mount to hold the HVAC air filter and mounted the reservoir to the firewall. A hole was cut into the top cover to allow access to the lid for the reservoir and a Methanol line was routed out the bottom of the bottle though the firewall and over to the pump.

This is the cowl area with the top cover removed.

I made a custom mount to seal the HVAC air filter to the firewall. This gave me the extra space needed to mount the Methanol Reservoir to the outer firewall.

In the picture below the Methanol Reservoir is mounted to the outer firewall. This cowl area provided protection from engine heat and a convenient way to fill the reservoir.

With the Methanol Reservoir mounted and the cowling reassembled this is what it looks like. The subtlety of the cap goes almost unnoticed.

With naturally aspirated engines using less than 10:1 compression, Water/Methanol is used often in warm climates to get the intake temps lower. Benefits include 10-15 HP, increased timing, a more effective air/fuel ratio, increased gas mileage, and carbon free combustion chambers.
While power gains are typically less in stock compression naturally aspirated vehicles compared to high compression or forced induction engines, benefits can still be realized due to more timing advance, leaner air/fuel ratios, cleaner engine components, lower temperatures, and the use of the methanol in the injection fluid as a secondary fuel source.