Nitrous Express has developed a bolt on plate kit for the L99/LS3 Camaro. This system can be jetted to provide 35 to 200 additional horsepower. The additional power will help this nearly 4000lb beast get down the track quicker.
When adding Nitrous Oxide there are several other steps that must be taken to ensure the engine does not run lean or detonate. Typically it is recommended to run spark plugs two heat ranges colder and closing the gap down. For our application, we chose NGK BR7EF spark plugs. It will also be necessary to retard the timing 1.5 to 2.0 degrees for every 50 horsepower of nitrous in order not to damage parts. This can be done several different ways. There are aftermarket timing control boxes that can be programmed to retard timing at certain RPM’s to prevent detonation. Another option would be a custom programmed tune specifically for nitrous.
Besides timing control, the next very important component of adding Nitrous Oxide is the fuel system. Fuel and Nitrous go hand-in-hand in making power without sacrificing reliability. Depending on your application and horsepower level, an upgraded fuel pump and larger injectors may be needed.
The 5th Gen kit from Nitrous Express comes with a 10lb bottle, mounting bracket, billet injection plate, stainless lines and all other necessary bolts and electrical connectors. There are several optional items that can be installed to increase performance and reliability of operation.
The first item is an Automatic Bottle Heater. Having the correct bottle pressure is critical for proper operation and overall consistency. The Nitrous Express Bottle Heater includes the heater element, automatic pressure switch, HD 40 amp really and harness and a D-4 manifold. It can take a cold bottle and get it to the proper temperature in minutes. Ideal bottle temperature is 85° F with a pressure of 950 psi.
![]()
Typically the Nitrous bottle will be mounted in the rear of the vehicle. A stainless line runs from the bottle to the solenoid on the intake manifold. Naturally air will be trapped in the line until the solenoid is activated. By installing a Purge Valve the air can be released so that the Nitrous is ready to spray immediately. This will ensure that the Nitrous and Fuel spray the correct amount at the same time.

For racers who are looking for different ways to control the flow of Nitrous and Fuel, Nitrous Express offers a Maximizer 4 progressive controller. This electronic module can be programmed an infinite amount of ways depending on application. The Maximizer 4 progressive nitrous controller operates one or two separate stages of nitrous based on either time, RPM, MPH, throttle percentage or boost pressure.

The installation done by The LSX Dr. varies from the typical installation depicted in the instruction provided from Nitrous Express. Depending on what optional accessories you choose will determine what extra steps are necessary to complete the installation.
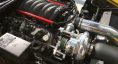
Installation starts with the removal of the air intake from the throttle body.
The throttle body is then removed from the intake manifold. The NX plate is installed between the throttle body and intake manifold. The fuel feed line is connected onto the NX solenoid and then to the fuel pressure port on the fuel rail. It is necessary to remove the schrader valve from the fuel rail. Depending on what horsepower level you choose will determine what size jet is used. The fuel jet is installed between the fuel hose and the fuel solenoid.


If you are installing a NX Purge Solenoid it will be installed with the NX plate. There will be 6 wires that need to be routed through the firewall inside the vehicle. The LSX Dr. is also using the NX Max 4 Controller. The controller will use the throttle position signal from the Purple wire in the throttle body harness. This wire will also need to routed inside the vehicle.

The main Nitrous feed line will also need to be routed through the firewall. It threads onto the NX plate solenoid and is routed on the side of the intake manifold. The Camaro has an unused hole in the firewall with a black plastic plug in it. This plug can be removed and the wires and NX feed line can be routed through. The LSX Dr. used a rubber grommet so the wires and NX feed line do not rub on metal.

Once the wires and NX feed line are inside they need to be routed to 2 different locations. The wiring for the purge valve is routed to where you will install the purge switch. The LSX Dr. chose to install all the control switches in the center console. This provides a clean and hidden look. The remaining wires will be routed to the trunk where the Max 4 Controller is located. The LSX Dr. fabricated a metal bracket that holds all the switches and fits perfect inside the center console.

When routing the main NX feed line from the firewall to the trunk, extra care should be taken to not kink or have excessive bends on the line. The supplied line allows for the bottle to be mounted anywhere in the trunk. The LSX Dr. chose to install the bottle on the right side. Once through the firewall the NX feed line is routed on the side under the interior body panels, then under the back seat. Once into the trunk you can choose your exact location. The LSX Dr. used magnetic retaining clips from Magdaddy to secure the NX feed line in the trunk. These clips come in a wide variety of choices and can be repositioned without any drilling. You can check out Mag-daddy, one of our other sponsors here.


The LSX Dr. mounted the Max 4 Controller in the trunk next to the batteries. This allows for easy power and ground connections, plus it is all hidden and clean. The 2 relays are also mounted next to the Max 4. The LSX Dr. also made custom harnesses with weather pack connectors for the bottle heater and pressure switch. This allows for easy removal and quick connections. The Max 4 Controller comes with a software CD so it can be programmed for the user’s custom application. A short USB cable can be connected to the Max 4 Controller and tucked away in the trunk so a laptop can connect if changes are needed at the track.

There are several bottle mounting brackets available from Nitrous Express. The LSX Dr. chose the Billet Bottle Bracket and mounted it securely to the trunk floor. The harness for the bottle heater and pressure switch come through the carpet.

The bottle heater wraps around the bottle and plugs into the harness from the relay.
![]()
With the bottle securely mounted in the trunk the installation is complete. The LSX Dr. recommends re-checking all wire connections as well as the Nitrous and Fuel lines for secure connections and no leaks.